tagged  VB, VB6, download, install, microsoft, msdn, msdn help, msdn library, visual basic, windows in Microsoft, PC, Programming, Windows
Microsoft, PC, Programming, Windows  This is an ongoing blog of web tools and technology related to worship, music and church. The idea is to give you good web points and resources that you can go to. Some of it is just me cruising the net, others are favorites of friends.
Enjoy what you see here. If you find an interesting, useful and technology related site or resource that deals with helping worship or musicians in general, please send us a note and we will check it out. Perhaps we can feature it here.
Thanks!
Enjoy! - Kim Gentes
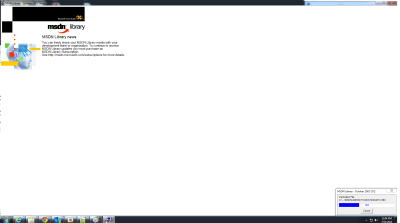
If you have had to regress to installing Visual Basic 6 studio on your modern Windows OS (Windows 7, 8 or such) to support or maintain some older software, you will quickly remember the ease of the integrated MSDN library that came as part of the embedded help you could install with VB6. Today, if you do not have the original discs that the MSDN library came on, it can be next to impossible to figure out where to get the right version MSDN help that works with VB6, and once you have it, how to install it best for your VB6 use.
This is just a quick guide to help you locate where to download it, get it installed and up and running with your VB6 studio. The guide has 4 main sections:
If you already have the downloaded MSDN library from Oct 2001, skip ahead to the appropriate section and follow the extraction/installation instructions as appropriate. If you don't have anything, read this guide through completely and you will be able to download, extract and install the MSDN library for VB 6.
To legally download the MSDN Library for VB 6, you must be a paid Visual Studio Subscriber. You cannot get access to the oldest archived MSDN Libraries (this one is from 2001) without a paid level Visual Studio subscription (formerly called MSDN subscription).
Let me pause for a moment-- YES, you can download the MSDN Library 2001 edition from other non-legit sources around the internet. But I do not, and will not, recommend that. Three reasons: 1) It's illegal. 2) Those sites often are simply hackers using the bait of "free downloads" to get a virus installed on your computer. and 3) I have looked at a number of those sites claiming to archive this specific download and all of them exclude some part of the MSDN Oct 2001 Library from their download chunks- that is, it is missing some part that makes it incomplete. You can hassle and try to figure out if you have all the parts, if they are legit, if they are filled with viruses and if they will work. Or, you can simply use a legit Visual Studio subscription.
I have tried using the free Visual Studio account that anyone can get (Visual Studio Dev Essentials), but it doesn't allow access to the MSDN October 2001 Library (or any of the older MSDN Library downloads from what I can see). I was able to access it via Professional, Test and Enterprise level subscriptions.
Once you have your Visual Studio subscription login, then you can go to the download location quickly:
STEP 1: When you click on this link, MS will force you to login to your Visual Studio account. You must use your Visual Studio Subscriber Login to access this link: https://my.visualstudio.com/Downloads?q=2001&pgroup=MSDN%20Library
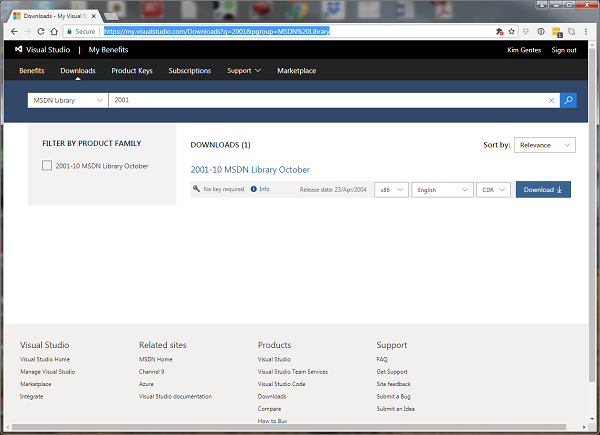
STEP 2: You should see the "2001-10 MSDN Library October" shown in the download results. You will note the bold, blue box that says "Download". Click that box to reveal your download options.
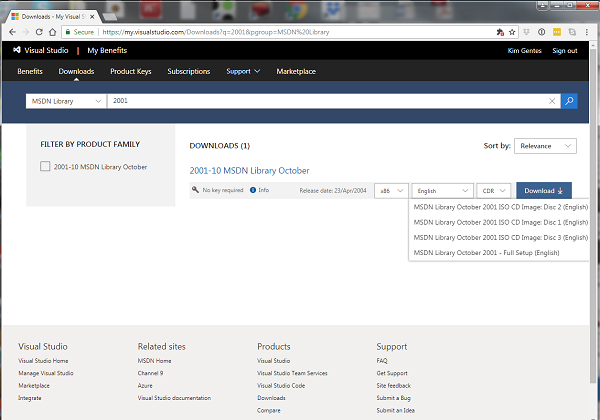
STEP 3:To get the full MSDN library to work with your VB6 Studio, download the "MSDN Library October 2001 - Full Setup (English)" (this file will be called "en_msdn_library_october2001_dvd.exe"). Alternatively, you can download 3 separate ISO files for CD-ROMs. NOTE: the total download is about 1.2Gb so it will take 20 minutes or so on a 1Mb/sec connection
STEP 1: Go the location where the download is located.
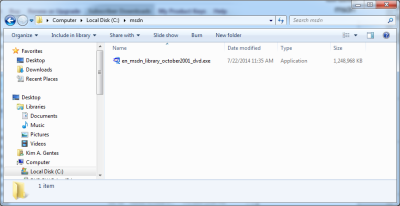
STEP 2: Double click the file "en_msdn_library_october2001_dvd.exe" and run it. It will open a WinZip extractor application.

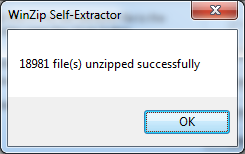
STEP 3: Click "Unzip" and the MSDN Library install files will be extracted to the directory you selected.
STEP 4: Once completed, click "OK" on the WinZip completed dialog (should show something like 18981 files extracted). Then close "Close" on the WinZip Self-extractor app.
STEP 5: In the directory in which the files were extracted you should now see a complete Setup.exe and associated files and directories.
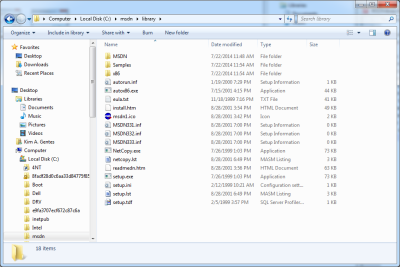
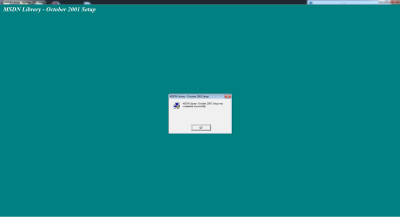
STEP 1: Double click the "setup.exe" file and it will begin the install of the MSDN Library
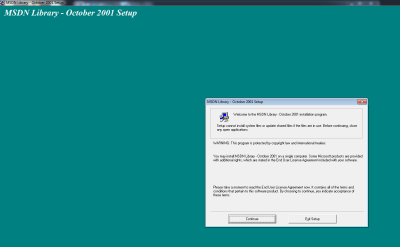
STEP 2: Welcome Screen - click continue.
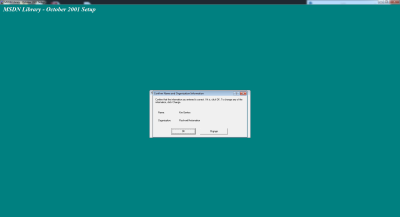
STEP 3: Name & Org - Enter what you'd like, click OK

STEP 4: Confirm Name & Org - Click OK
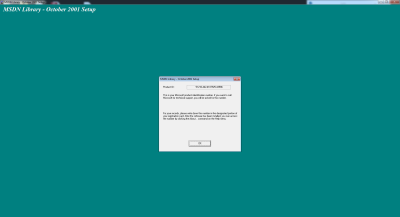
STEP 5: Product ID Screen - Click OK
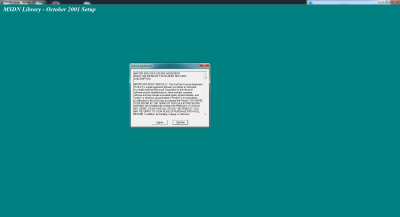
STEP 6: License Agreement - Click "I Agree"
STEP 7: Choose Install - In most cases, you can choose Typical, however, if you are just installing MSDN Library for VB6 usage, choose Custom
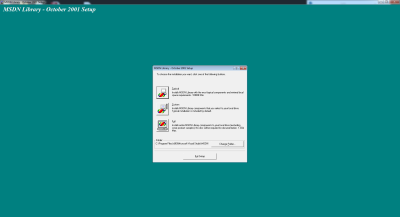
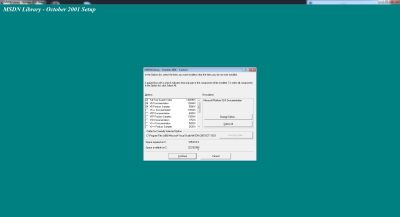
STEP 8: Options List - Choose the first 3 options in the custom install, and scroll down to select any other portions you wish to install of the library. Click "Continue"
STEP 9: Desktop Shortcut - click Yes or No, whatever you would like.
STEP 10: Let the MSDN Library install run. It may take several moments.
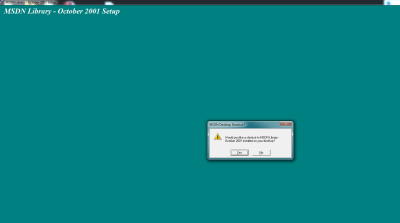
STEP 11: Install Complete - Click OK
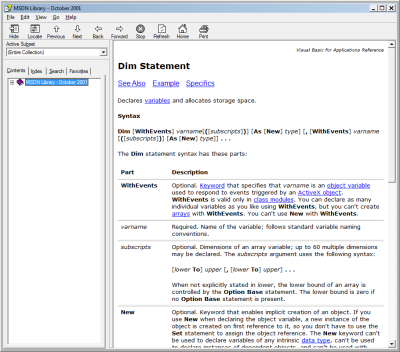
Now, when you run VB6, you can use F1 on any location in your code and VB context help will expand and link instantly as appropriate.
Microsoft, PC, Programming, Windows ![]() For twenty years I have been involved in worship ministry in local churches. It has been from both a sense of joy and calling that someone does that. In that time, I have had the opportunity to be involved in churches from 20-500 people, including two church plants and 3 established churches. Along the way, I've been invited to lead at various places with groups ranging from 10 to 1000 and more. Every context is unique and leading worship through music for each context means that you need the right tools and resources.
For twenty years I have been involved in worship ministry in local churches. It has been from both a sense of joy and calling that someone does that. In that time, I have had the opportunity to be involved in churches from 20-500 people, including two church plants and 3 established churches. Along the way, I've been invited to lead at various places with groups ranging from 10 to 1000 and more. Every context is unique and leading worship through music for each context means that you need the right tools and resources.
In many situations, having a compliment of skilled musicians for a full band is not possible. Church plants, special events, youth nights and other situations sometimes leave you standing there with your guitar, playing away, worshiping your heart out. I believe that God is honored when we give Him everything we have each time we worship- our surrendered hearts are what He looks for (Psalm 51:17). That being said, as your community is gathering you can sometimes find yourself with parts of a band (such as a drummer and keyboardist, but no bassist). These people are ready to serve, but it would be helpful to be able to "sub" in that missing player until a person arrives at your church who can serve in that role.
Enter "Worship Backing Band" (WBB for short). A couple years ago, I noticed that a number of these software tools were releasing to supplement musical tracks for musicians in local church settings. I had known the folks at Musicademy because of the great training resources they released over the years (which I had tried and reviewed favorably). So I knew I wanted to check out there new "Worship Backing Band" software at some point.
The version I was able to download is the latest (1.5) and it comes available for the Mac or PC. I choose to do my testing and using it on both a PC and a Macbook Pro so I could get the feel for both environments interactions. Downloading and installing it was simple enough. Once installed, I went and acquired a few songs to do my testing (I chose "Bless The Lord/10000 Reasons", "How Can I Keep from Singing", "Let God Arise" and "You Alone Can Rescue"). The model for this is that you purchase the player for $25 (it always comes with one free song of the month), and then you purchase individual songs that you need (priced from $8.99 down to $6.91, depending on how many songs you buy). Compared to the hundreds of dollars you might spend on Ableton Live (which I have and use, as well) on just the software, this is very, very affordable.
Once you download and install all the songs, you are ready to use the software. The nice thing about the software is that using it on PC or Mac is identical. The interface and functionality is replicated perfectly. Using the system is, above all, simple! The right pane of the application contains a playlist for the songs you want to use in your worship set. You load songs into it by clicking on the "library" button and exposing the songs available to you in the middle pane from your library. Drag and drop the songs from the middle library pane into your playlist on the right.
On the left side pane is a mix control panel for each of the instrument tracks in the song. Everything from lead voice, background vocals, acoustic guitar, electric guitars (2 tracks), keyboards (2 tracks), bass, drums and couple of click tracks (regular and shaker) are available. There is even a vocal cue track.
Here is how you use it:
Basically, 90% of what you will want to do with WBB is covered by those instructions. However, you can adjust the volume for any track if you want more/less of any instrument. As the song plays, you can also jump to or repeat sections using keyboard keys "<>" and "g". The beauty of this tool is that it is clear, simple, and easy to use. If you use a PC or Mac laptop, and want an easy-to-use software package for adding virtual instruments to your regular band members, you should really look at Worship Backing Band.
Once it was installed, I grabbed my guitar and was ready to go within just 30 seconds using this software and my Macbook Pro. While there are no advanced features for saving the segment flow of a song (only the mix), or for adding your own custom tracks, this program allows you to do what you minimally want to do. Musicademy has over 125 popular worship songs in their purchasable song library for your church, which would be 90% of the common songs used by many churches. That along with the the minimalist approach on the interface of this tool makes Worship Backing Band simple, clear and easy-to-use. The nice thing is, you don't have to spend any money to try WBB out. Musicademy has a functional demo version of the software that you can download for Mac or PC. Below is a summary video that is all the instruction I needed to get going and use WBB.
If you want to try out Worship Backing Band, go here and check out the details, download the demo and see the song library: Worship Backing Band
NEW WBB 2.0 Update: After I had completed the initial review of version 1.5, I was able to get a sneak peek at the latest update to WBB version 2.0. This new version comes with a number of significant updates for those who want more power and control. It is important to note that the new Worship Backing Band software (v2.0) will be called "MultiTrack Pro Wav Player". The current version will still be available for those wanting the current functionality and not needing anything else. The main updates I found bring the player up to another level of helpfulness for the local church worship leader. Here are the highlights:
All in all this "MultiTrack Pro Wav Player" update is great. Be sure to check out Worship Backing Band.
Review by Kim Gentes
If you have Windows 7 you may be using the feed feature to update a constant stream of background images to keep your desktop fresh. If you are like me, occasionally a family member sees your background image and wants to use it, but they don't want to be on a feed for changing it regular. Or maybe you just love the background image and want to save it and make it your permanent image. Windows 7 allows you to access images in such a feed, and then you can save them offline for permanent setting. Here is how.
First, move your cursor to your desktop and click the right-mouse button. This will reveal a context mini-menu.
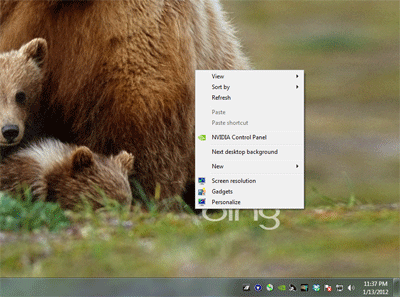
From that menu, select "Personalize" (normally, the last option). This will open up the Control Panel applet for personalization. One of the themes in use will be selected. If you want to access pictures from any other place than the current one in use, select that theme now.
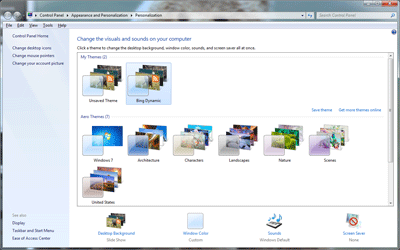
At the bottom of the applet frame you will see an icon labele "Desktop Background" with the words "Slide Show" undernearth. Select that link.
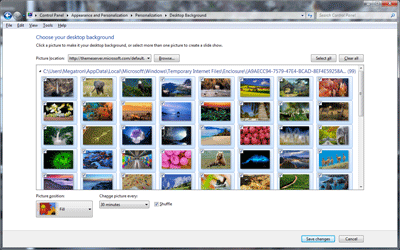
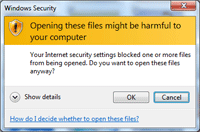
This will open up the library of images in the theme/feed you are interested in. Scroll down to the image you are interested in and right-mouse click the image. If your theme is a feed from the internet, this will bring up a security warning.
Select "OK" if you get the security warning (assuming your image feed/theme is secure and ok).
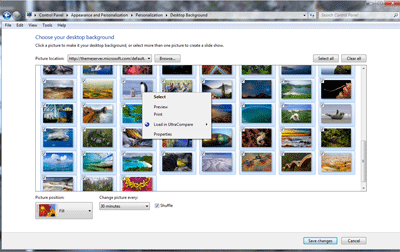
This will bring up another mini-menu. Select the "Preview" option on the mini-menu.
This will open the image in the Windows Preview browser.

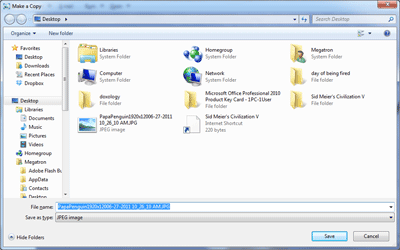
Use the "File" menu on the Windows Preview application. Use the "Make Copy" option and save a copy of the image file to your desired location.
You now have a copy of the desktop image from your theme or feed.
Kim Gentes
Editor's Note: This tech blog entry is made by Jordan Gentes, a cell phone expert who is also a web support technician for WorshipTeam.com. Jordan has spent years studying phones, from various companies, carriers and plans and the depth of cell networks and technologies. When he says something about cell phones, I listen, because he is speaking from more experience and knowledge than anyone I know on the topic. ---Kim Gentes, Editor
 Windows Phone 7.5 Review
by Jordan Gentes
Microsoft’s new phone platform Windows Phone7.5 is intuitive, simple, and brilliant. Wait, did you just use those three words in the same sentence as Microsoft and Windows? Yes, I did. This new development by Microsoft brings an important piece to the mobile environment.
Intuitive: The OS its-self is very intuitive. When you power on the display you are welcomed to live tiles that are beautiful and easy to understand. Gone are the days of cluttered notification bars and crowded clusters of apps. Windows Phone ushers in a day of relevant information that updates seamlessly.
Simple: With the introduction of live tiles the Windows Phone OS is super simple to navigate. The OS is attractive to all ages, something that neither iOS nor Android can say. This OS provides an enjoyable user interface that is simple, but powerful.
Brilliant: Windows Phone is brilliant; so many functions that users count on daily are built into the framework of the user experience.
Synopsis:
![]() This particular review was conducted on an HTC Trophy, however, yet another thing I love about Windows Phone is every phone gets updates, meaning everyone has a congruent user experience. The battery life on this particular device is incredible (for a smartphone) I easily go the entire day with no problems. On one day of very heavy usage I got a low battery warning at 15 hours, however, on a normal usage day (that would involve several emails, 100-150 text messages, 30 minutes on the phone, and some casual internet browsing) the phone still had 40-50% battery remaining at 15 hours. Battery usage will vary by device somewhat, however, the OS manages power quite efficiently. Windows Phone is a true representation of a modern mobile experience. Windows Phone is clean and it’s such an inviting user interface that I am confident anyone would enjoy the experience.
This particular review was conducted on an HTC Trophy, however, yet another thing I love about Windows Phone is every phone gets updates, meaning everyone has a congruent user experience. The battery life on this particular device is incredible (for a smartphone) I easily go the entire day with no problems. On one day of very heavy usage I got a low battery warning at 15 hours, however, on a normal usage day (that would involve several emails, 100-150 text messages, 30 minutes on the phone, and some casual internet browsing) the phone still had 40-50% battery remaining at 15 hours. Battery usage will vary by device somewhat, however, the OS manages power quite efficiently. Windows Phone is a true representation of a modern mobile experience. Windows Phone is clean and it’s such an inviting user interface that I am confident anyone would enjoy the experience.
Amazon Product Link: HTC Trophy Windows Phone
 Facebook is fast becoming the hub of our online activity, as both personal and organizational communications are often easier to do through Facebook than almost any other mechanism. Need to talk to relatives? Use Facebook. Have to organize a church small group? Making a Facebook group is a cheap, and effective method to factiliate communications. Want to reach customers for your business? Facebook pages and apps are becoming very important.
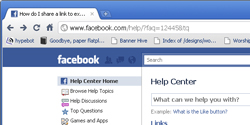
One of the most effective methods of quickly getting information out on Facebook is to "Link" an external page into Facebook, on a wall post or in a group or Page. Facebook nicely slurps up a summary of the external web page, blog or site and creates a thumbnail and header for the link that is easy for people to quickly see what the link is for. But there is a problem. Facebook sometimes cannot understand images that appear on external sites when the image or web page does not have interprettable or compatible properties. You will see the webpage text summary in the link preview, but not the image. It will looking something like this:
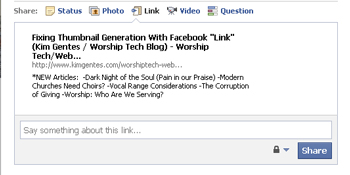
If the page had images and you don't see the image as a thumbnail option in the above preview, you will know there was a problem with the page or the image being interpretted correctly by Facebook.
If you try to link to an external page to post your link on Facebook and you find your image does NOT show up in the link summary, here are a few things you can try to get Facebook to slurp your image and place a thumbnail for your link in Facebook.
 Taller / Narrow Image
 Wider / Short Image
I wish I could tell you that Facebook is consistent with all the things it does, but frankly, it just isn't. Try each of the above fixes to see what your particular situation might be. There are several other articles out there that deal with meta data tagging and image specifications, but I have found that they are rarer cases, though important to look at. For more information on addressing this issue of thumbnails in Facebook links, this is a good all around article to read:
http://www.ehow.com/how_4938148_thumbnail-show-up-facebook-share.html
Happy Facebook linking!
Kim Gentes